Damaged Disk Data Recovery Safe Practice
Get 1000000 0FP0EXP Token to remove widget entirely!
Get 500000 0FP0EXP Token to remove my NFTS advertisements!
While it is true that the checking error process, the attempts to fix them, and the bad sector reallocation process are the procedures to fix a damage drive but they are actually the last steps in data recovery procedure. Sure that directly fixing a driver is faster and have a high probability of success but if you value your data, you should that there is also a low probability that the fixing process can further damage the drive and may result in your data permanently unretrieveable. Therefore, the safe practice procedure in handling the damaged driver is to secure the recoverabiltiy of your data.
Lessons Learned
I wrote this with experience where two events taught me this lesson:
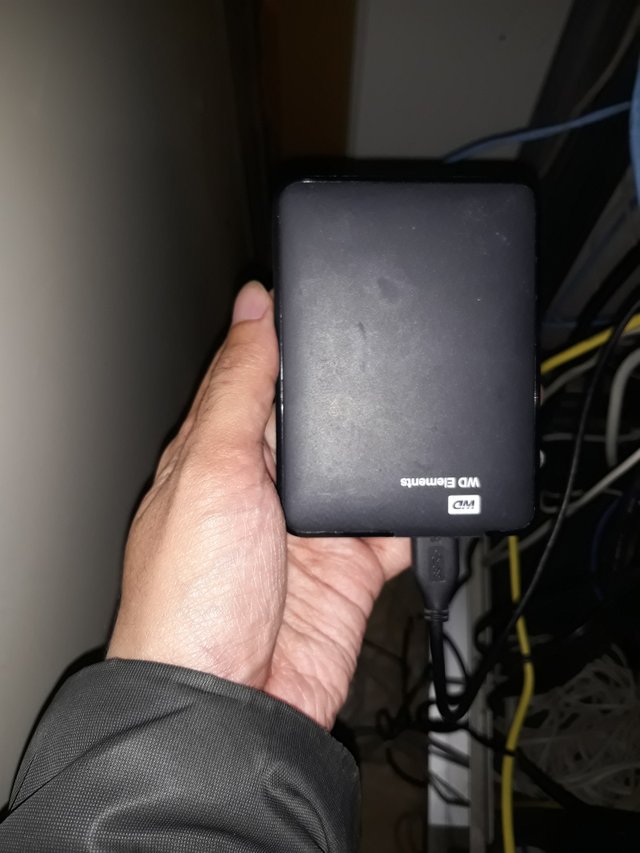
- I had a shaky universal serial bus (USB) port and 4 terrabyte (TB) USB external hard drive with just the slightest touch could unsafely disconnect the external hard drive. I kept ignoring this and many times in a month, I watched videos for my external hard drive and often the video stops due to disconnection of me accidently touch the cable because of getting snacks and othe stuffs. Finally, there was a point when my external hard drive’s contents were unreadable on Windows but still readable on Linux. The mistake that I did after this was performing check error, fix attempt, and reallocating bad sector on Windows instead of reading the data on Linux and backup. The result is that the bad sector reallocation failed due to not enough space on the external hard drive and made the data also unreadable on Linux. This is the experience that gave me wisdom to write this damaged drive data recovery safe practice guide.
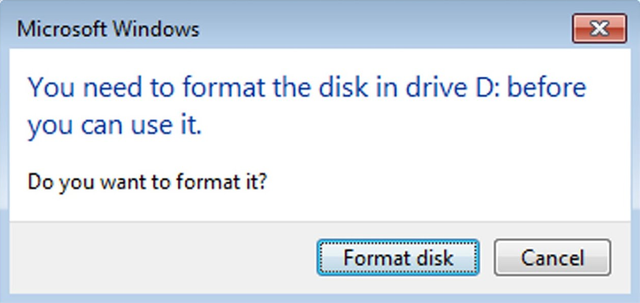
- My other experience was actually before the above experience that taught me to not be hasty with the damaged drives which is better to wait for hours when it is stuck. This happens when I borrowws my 2 terrabyte (TB) USB external hard drive to a friend and it did not showed up on his Windows. Instead of being patient or at least shutting down the laptop, we plugged in and plugged out multiple times. Finally, the result was most of my data are unrecoverable. Maybe I would have saved the data if I tried cloning it back then, but I immediately perform check disk error right away and the stucked progress bar made me impatient and plugged it out immediate before it can finish.
The Missing Procedures
If your data are important, do not attempt to fix the damaged drive but secure the recoverability of your data.
- It is worth to buy another hard drive with data capacity much larger that the damaged drive to backup your data or at least as large.
- Try mounting the damaged drive on Linux if it does not work on Windows and vice versa and other operating systems if you are patient enough. If you are lucky to able to read the data, read or listen to my experience and back them up immediately.
- If you cannot read the drive, then clone it and spend most of your effort on this step.
- Make a copy of the clone you just made because there is a chance that the damaged drive becomes more damaged and cloning the second or mort times may no longer work.
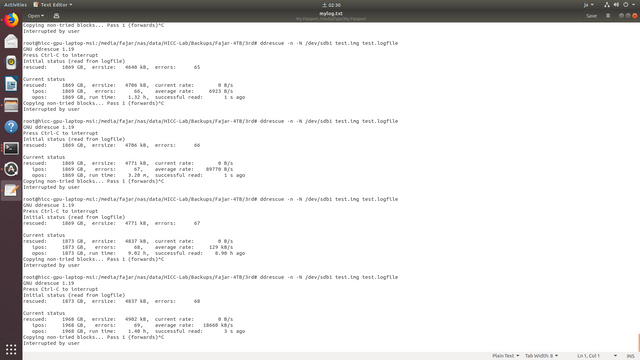
If your cloning succeeded with the default Linux Disk tool and Windows tool, then all is well but if you are having problems, I recommend you to try Ddrescue because it has pause and continue feature which you can clone at your leisure time and the flexibility to skip heavily damaged sectors or retry with different options until it succeeds. If you know other tools, please leave a comment.
The following command is the regular command to clone an image which relies on the log for pausing and continuing cloning:
lsblk
ddrescue [options] infile outfile [mapfile] (for example:)
ddrescue -r 2 /dev/sdb1 clone.img clone.log
If the process stucks or you just want to take a break type ctrl+c and/or ctrl+z. You can then type the same command that indicates the same infile outfile mapfile to continue. If you meet a first stuck, I recommend to continue cloning starting from reverse order:
ddrescue -r 2 -R /dev/sdb1 clone.img clone.log
If the process stucks again no trim, then no scrap, and remove retry command if necessary, also try reverse and non-reverse:
ddrescue -N /dev/sdb1 clone.img clone.log
ddrescue -N -n /dev/sdb1 clone.img clone.log
If the process stuck, then no other choice but to skip errors, rescue certain blocks only, and other options available on https://www.gnu.org/software/ddrescue/manual/ddrescue_manual.html:
ddrescue -N -n -w /dev/sdb1 clone.img clone.log
Once you have a clone file and a copy of it, mount the clone and you can do whatever you want with it like whether you attempt to recover files and directories first or directly proceed in fixing the clone file structure.
Recovering Data
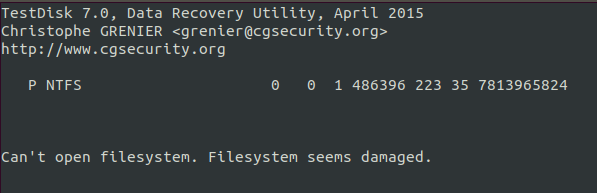
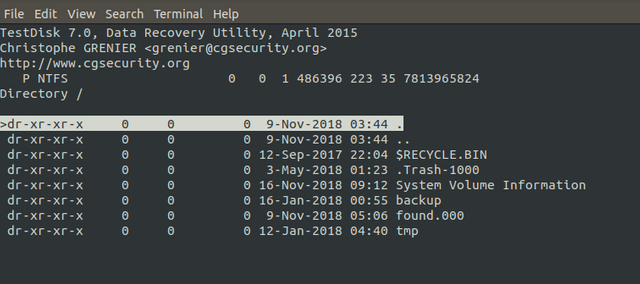
Again, if you succeeded in creating a clone you may skip this step and fix errors directly if you like but if you failed, I recommend going through this process first as fixing errors may create more errors. The first tool I recommend is testdisk because it can recover not only the files but the directory structure as well. Use the following command to mount the image using testdisk but if you want to mount physical drives then just type testdisk as an administrator though I did not succeed in recovering the data from the cloned image:
testdisk [image] (in my case:)
testdisk clone.img
Another one that I recommend is RecuperaBit which is based on the author’s Masters Thesis and the reason I recommend this one is that there is a chance that it may succeed in recovering files where others cannot. If those directory structure recovery tools does not work, then the later choice will be tools that can scrap files but cannot maintain the directory structure which is great inconvenience for huge data but what other choice do we have? One package with testdisk is PhotoRec and exclusively for Windows is Recuva from CCleaner. Again, please comment if you know anymore tools.
Fixing Damaged Drive
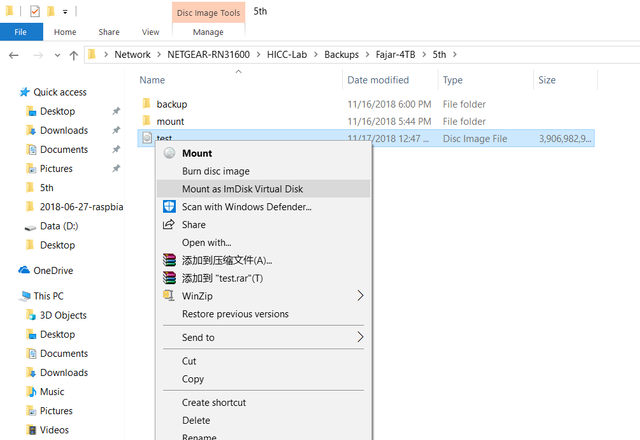
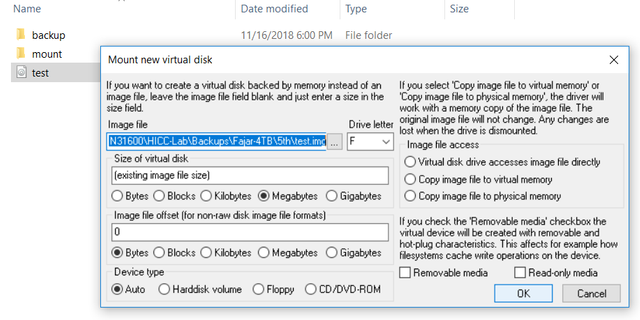
I did not succeed in using testdisk on the cloned image and I decided to proceed straight away to fixing the cloned image. However, if you failed in creating a clone and about to fix your driver directly, I highly encourage to try data recovery tools before attempting to fix. Anyway, the partition type of my disk was NTFS, so I assigned the cloned image to letter F using ImDisk as shown on previous images. If you know a better tool to handle disk image mounting, then please leave a comment. After mounting, I open command prompt (cmd) as administrator and perform Windows CHKDSK.
chkdsk /?
chkdsk [options] [drive letter]
The first step is most likely safe to do where it is less likely to further damage the driver which are error checking and fixing and another command to automatically unmount if necessary:
chkdsk /f /x F:
The next command is the dangerous step which is reallocating bad blocks as I wrote in my experience that is this step that further damage the drive (I am not sure whether /f option is necessary or not):
chkdsk /f /r /x F:
The bad blocks reallocation further damaged the driver where back then was not enough space on the target driver. However, I did this on a cloned disk image and have more space within the new drive and the bad block reallocation actually succeeded. I then use testdisk to backup the files and directory structure.
In Linux, the tools is file system check (fsck).
fsck [options] [disk driver] (for example)
fsck /dev/sdb1
fsck is a bit smart where it may evaluate that it is unnecessary to perform but actually it is. It maybe necessary to force it.
fsck -f /dev/sdb1
It is not rare where you are prompted to agree many times and it is tiring to press yes all the time. Use the following command to automatically agree:
fsck -fy /dev/sdb1
If this still fails then the last option I know is to fast format the drive (warning, it has to be “fast format” not “complete format”). Then repeat the process of cloning the disk and if it fails try data recovery tools and lastly fix errors and bad blocks reallocation.
Mirrors
- https://www.publish0x.com/0fajarpurnama0/damaged-disk-data-recovery-safe-practice-xrovnkn?a=4oeEw0Yb0B&tid=github
- https://0darkking0.blogspot.com/2020/10/damaged-disk-data-recovery-safe-practice.html
- https://0fajarpurnama0.medium.com/damaged-disk-data-recovery-safe-practice-680903ec53c0
- https://0fajarpurnama0.github.io/internet/2020/10/26/data-recovery-safe-practice
- https://blurt.world/blurtech/@fajar.purnama/damaged-disk-data-recovery-safe-practice?r=fajar.purnama
- https://hive.blog/computers/@fajar.purnama/damaged-disk-data-recovery-safe-practice?r=fajar.purnama
- https://steemit.com/computers/@fajar.purnama/damaged-disk-data-recovery-safe-practice?r=fajar.purnama
- https://hicc.cs.kumamoto-u.ac.jp/~fajar/internet/data-recovery-safe-practice.html
- https://0fajarpurnama0.wixsite.com/0fajarpurnama0/post/damaged-disk-data-recovery-safe-practice
- http://0fajarpurnama0.weebly.com/blog/damaged-disk-data-recovery-safe-practice
- https://0fajarpurnama0.cloudaccess.host/index.php/13-computers-and-internet/83-damaged-disk-data-recovery-safe-practice
- https://read.cash/@FajarPurnama/damaged-disk-data-recovery-safe-practice-d9818160
- https://www.uptrennd.com/post-detail/damaged-disk-data-recovery-safe-practice~Nzg4MDUx